当有很多机器需要安装时,一台台的用光盘安装效率会比较低下。本文介绍一种基于PXE和Kickstart技术的RedHat Linux无人值守安装方式,仅需人工开机并选择从网络启动即可,大大提高了系统安装效率。
Contents
相关技术介绍
PXE协议
PXE(Pre-boot Execution Environment 预启动执行环境)是由Intel设计的协议,它可以使计算机通过网络启动。协议分为client和server两端,PXE client在网卡的ROM中,当计算机引导时,BIOS把PXE client调入内存执行,并显示出命令菜单,经用户选择后,PXE client将放置在远端的操作系统通过网络下载到本地运行。
PXE协议的成功运行需要解决以下两个问题:
- 既然是通过网络传输,那么计算机在启动时,它的IP地址由谁来配置;
- 通过什么协议下载Linux内核和根文件系统
对于第一个问题,可以通过DHCP Server解决,由DHCP server来给PXE client分配一个IP地址,DHCP Server是用来给DHCP Client动态分配IP地址的协议,不过由于这里是给PXE Client分配IP地址,所以在配置DHCP Server时,需要增加相应的PXE特有配置。
至于第二个问题,在PXE client所在的ROM中,已经存在了TFTP Client。PXE Client使用TFTP Client,通过TFTP协议到TFTP Server上下载所需的文件。
这样,PXE协议运行的条件就具备了,下面我们就来看看PXE协议的工作过程。

pxe工作过程
在上图中,PXE client是需要安装Linux的计算机,TFTP Server和DHCP Server运行在另外一台Linux Server上。Bootstrap文件、配置文件、Linux内核以及Linux根文件系统都放置在Linux Server上TFTP服务器的根目录下。 PXE client在工作过程中,需要三个二进制文件:bootstrap、Linux 内核和Linux根文件系统。Bootstrap文件是可执行程序,它向用户提供简单的控制界面,并根据用户的选择,下载合适的Linux内核以及Linux根文件系统。[1]
Kickstart概念
KickStart是由红帽公司创建的一种无人职守安装方式。KickStart的工作原理是通过记录典型的安装过程中所需人工干预填写的各种参数,并生成一个名为ks.cfg的文件;在其后的安装过程中(不只局限于生成KickStart安装文件的机器)当出现要求填写参数的情况时,安装程序会首先去查找KickStart生成的文件,当找到合适的参数时,就采用找到的参数,当没有找到合适的参数时,才需要安装者手工干预。这样,如果KickStart文件涵盖了安装过程中出现的所有需要填写的参数时,安装者完全可以只告诉安装程序从何处取ks.cfg文件,然后去忙自己的事情。等安装完毕,安装程序会根据ks.cfg中设置的重启选项来重启系统,并结束安装。[2]
使用kickstart来安装系统可以通过本地CD-ROM、本地磁盘、或者通过NFS、FTP、HTTP来进行。[3]
为了使用kickstart,你必须:
- 创建一个kickstart文件
- 创建一个带有kickstart文件的启动磁盘,或者让kickstart可以通过网络访问
- 使能安装树
- 开始kickstart安装
关于如何创建Kickstart文件,请参考:https://fedoraproject.org/wiki/Anaconda/Kickstart/zh-cn 或者 http://blog.chinaunix.net/uid-17240700-id-2813881.html
本文使用PXE从网络访问Kickstart文件。
安装服务器搭建
拓扑结构
限于条件,本文安装服务器和待安装机器均使用VMware虚拟机。拓扑结构如下图所示
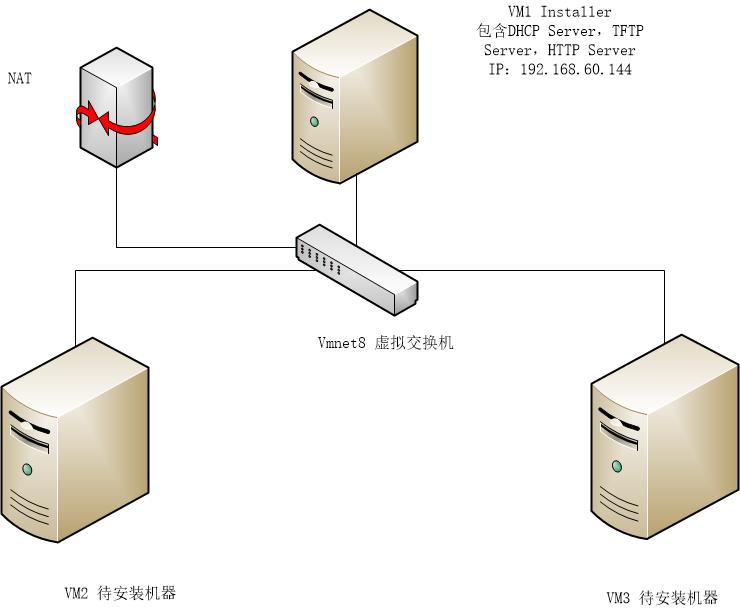
pxe安装拓扑图
使用NAT模式,VM1作为安装服务器(Installer),VM2,VM3作为待安装服务器。PXE安装需要的所有服务都构建在VM1上。VM1上各种服务的用途为:
Dhcpd: 分发IP地址。
Tftpd: 分发启动文件安装。
Httpd:分发系统文件安装。
准备必要的文件
准备Centos镜像、引导程序及KS文件,关闭selinux和iptables。(开启selinux和iptables可能会有权限问题报错[4])。
#安装准备工作
function Initialize ()
{
	#关闭selinux和iptables
	sed -i "s/SELINUX=.*/SELINUX=disabled/g" /etc/sysconfig/selinux
	service iptables stop
	chkconfig iptables off

	#准备启动镜像
	rpm -qa |grep syslinux && r=0 || r=1
	[ $r -eq 1 ] && yum install -y syslinux

	#准备系统文件
	[ ! -f $MIRROR ] && { echo "No Centos mirror found, Please Download it yourself and put it to the same directory with this script....exit"; exit 1;}
	#挂载iso
	[ ! -d /mnt/isoforpxe/ ] && mkdir /mnt/isoforpxe/
	mount -o loop $MIRROR /mnt/isoforpxe/

	#准备KS文件
	cp conf/ks.cfg $WEBDIR$KSDIR
	sed -i "s#^url.*#url\ --url=http://$IPADDR/$IMAGEDIR#g"  $WEBDIR$KSDIR
}
配置TFTP服务器
主要注意disable要改成no,开机启动tftp。server_args指定了tftp的工作目录。如果没有需要自己建立。
#安装并配置TFTP服务器
function ConfigTFTPD ()
{
	#安装tftp服务器
	rpm -qa |grep tftp-server && r=0 || r=1
	[ $r -eq 1 ] && yum install -y tftp-server*
	rpm -qa |grep xinetd && rr=0 || rr=1
	[ $r -eq 1 ] && yum install -y xinetd*
	chkconfig --level 2345 xinetd on
	cat > /etc/xinetd.d/tftp <<eof

# default: off
# description: The tftp server serves files using the trivial file transfer \
#       protocol.  The tftp protocol is often used to boot diskless \
#       workstations, download configuration files to network-aware printers, \
#       and to start the installation process for some operating systems.
service tftp
{
        socket_type             = dgram
        protocol                = udp
        wait                    = yes
        user                    = root
        server                  = /usr/sbin/in.tftpd
        server_args             = -s /tftpboot
        disable                 = no
        per_source              = 11
        cps                     = 100 2
        flags                   = IPv4
}
eof
	# 上面要修改 disable 值为 no
	#server_args指定tftpboot文件夹,建立该文件夹
	[ ! -d /tftpboot ] && mkdir /tftpboot

	#tftp服务器用于分发启动文件,包括 initrd.img  pxelinux.0  pxelinux.cfg/default  vmlinuz等文件
	cp /usr/share/syslinux/pxelinux.0 /tftpboot	#复制引导程序到tftpboot目录
	cp /mnt/isoforpxe/images/pxeboot/vmlinuz /tftpboot	#复制Linux内核到tftpboot目录
	cp /mnt/isoforpxe/images/pxeboot/initrd.img /tftpboot		#复制ramdisk的映像文件到tftpboot目录
	[ ! -d /tftpboot/pxelinux.cfg ] && mkdir /tftpboot/pxelinux.cfg
	#cp /mnt/isoforpxe/isolinux/isolinux.cfg /tftpboot/pxelinux.cfg/default	#复制启动配置文件

	#编辑启动配置文件
	cat > /tftpboot/pxelinux.cfg/default <<eof
default linux
#prompt 1
timeout 600

display boot.msg

menu background splash.jpg
menu title Welcome to CentOS 6.5!
menu color border 0 #ffffffff #00000000
menu color sel 7 #ffffffff #ff000000
menu color title 0 #ffffffff #00000000
menu color tabmsg 0 #ffffffff #00000000
menu color unsel 0 #ffffffff #00000000
menu color hotsel 0 #ff000000 #ffffffff
menu color hotkey 7 #ffffffff #ff000000
menu color scrollbar 0 #ffffffff #00000000

label linux
  menu label ^Install or upgrade an existing system
  menu default
  kernel vmlinuz
  append initrd=initrd.img text ks=http://$IPADDR/$KSDIR

eof

	#ks=url指定了ks文件的访问路径
}
配置DHCP服务器
注意next-server和filename的配置。
#安装并配置DHCP服务器
function ConfigDHCPD ()
{
rpm -qa |grep dhcp-[0-9] && r=0 || r=1
[ $r -eq 1 ] && yum install -y dhcp
chkconfig --level 2345 dhcpd on
#使用安装服务器的网关
GATEWAY=` ip route show |grep default |awk '{print $3}'`
NETWORK=`ip route show |grep src |awk -F '[/]' '{print $1}'`
NETMASK=`ifconfig eth0 |grep "inet\ addr" |awk -F '[:]' '{print $4}'`
BROADCAST=`ifconfig eth0 |grep Bcast |awk -F '[:]' '{print $3}' |awk '{print $1}'`
DNS=`cat /etc/resolv.conf |grep nameserver |awk 'NR==1 {print $2}'`
RANGE_FROM=`echo $NETWORK |awk -F '[.]' '{print $1"."$2"."$3"."[1]$4+2}'`
RANGE_TO=`echo $BROADCAST |awk -F '[.]' '{print $1"."$2"."$3"."[2]$4-3}'`
cat > /etc/dhcp/dhcpd.conf <<eof
#
# DHCP Server Configuration file.
# see /usr/share/doc/dhcp*/dhcpd.conf.sample
# see 'man 5 dhcpd.conf'
#
#
ddns-update-style interim;
ignore client-updates;
allow booting;
allow bootp;
subnet $NETWORK netmask $NETMASK {
option routers $GATEWAY;
option subnet-mask $NETMASK;
option domain-name-servers $DNS;
option time-offset -18000; # Eastern Standard Time
range dynamic-bootp $RANGE_FROM $RANGE_TO;
default-lease-time 21600;
max-lease-time 43200;
next-server $IPADDR;
filename "pxelinux.0";
}
eof
#上面配置中指定了引导程序的名字(pxelinux.0)及TFTP服务器地址,以便从TFTP服务器获取必要文件
}
配置HTTP服务器
系统文件由http服务器提供。
#配置HTTP服务器
function ConfigHTTPD ()
{
	#安装http服务器
	rpm -qa |grep httpd-[0-9] && r=0 || r=1
	[ $r -eq 1 ] && yum install -y httpd
	sed -i "s/#ServerName.*/ServerName localhost:80/g" /etc/httpd/conf/httpd.conf
	chkconfig --level 2345 httpd on

	#复制安装镜像到web目录
	[ ! -d $WEBDIR$IMAGEDIR ] && mkdir $WEBDIR$IMAGEDIR
	cp -rf /mnt/isoforpxe/* $WEBDIR$IMAGEDIR

}
安装测试
执行脚本,搭建好 PXE Installer 服务器。然后分别开启2台虚拟机,进入bios设置从网络启动。注意安装完成之后重启时需要再次进入bios,改回硬盘启动,否则将再次安装系统。(服务器无需这样操作) DHCP获取IP
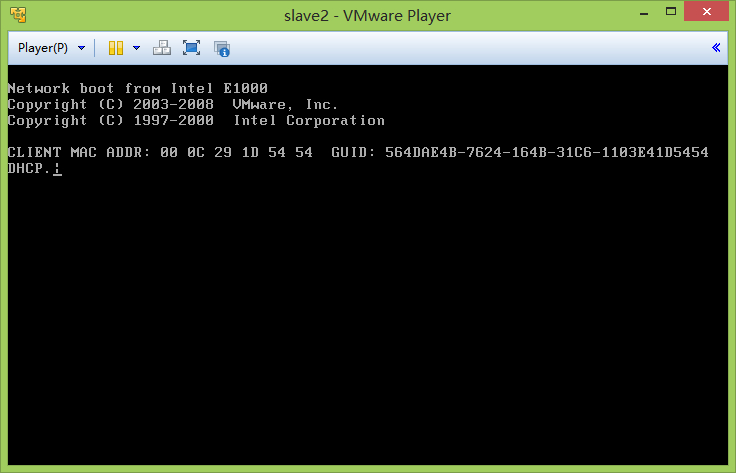
DHCP获取IP
加载内核
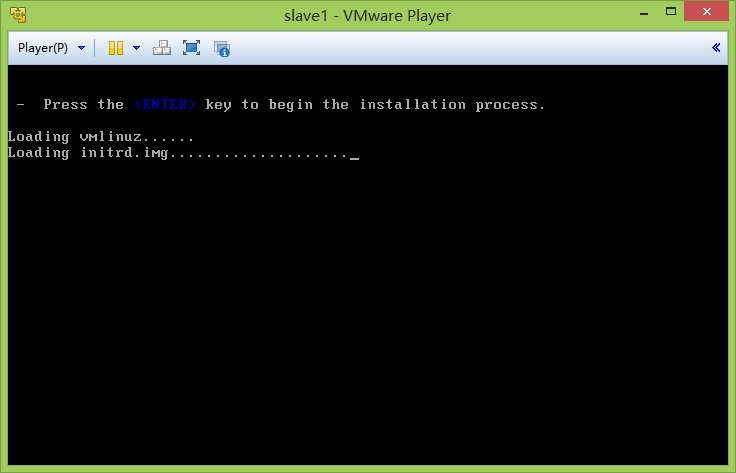
加载内核及initrd.img
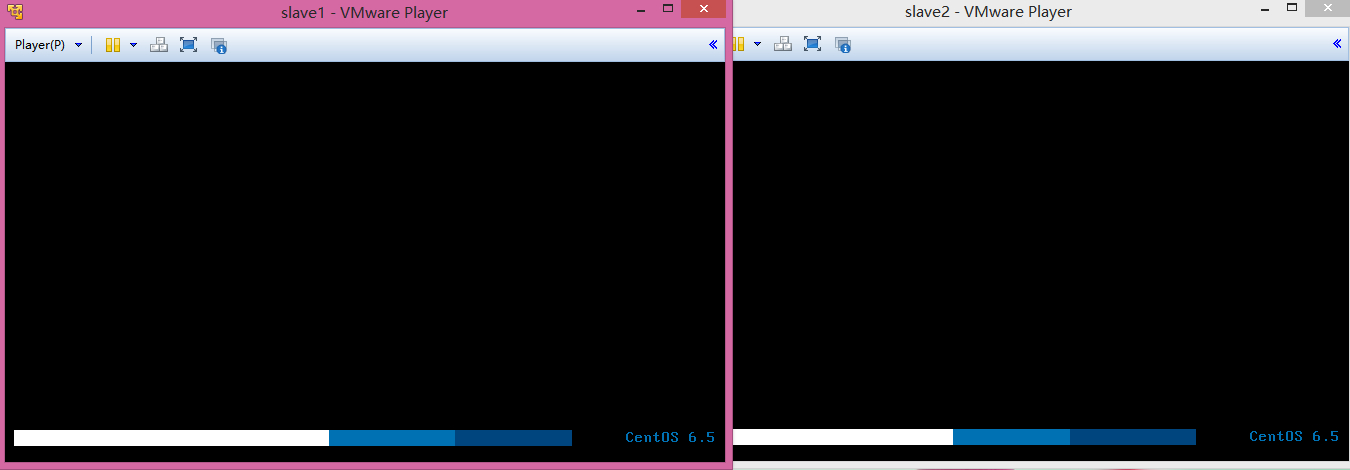
安装进行中
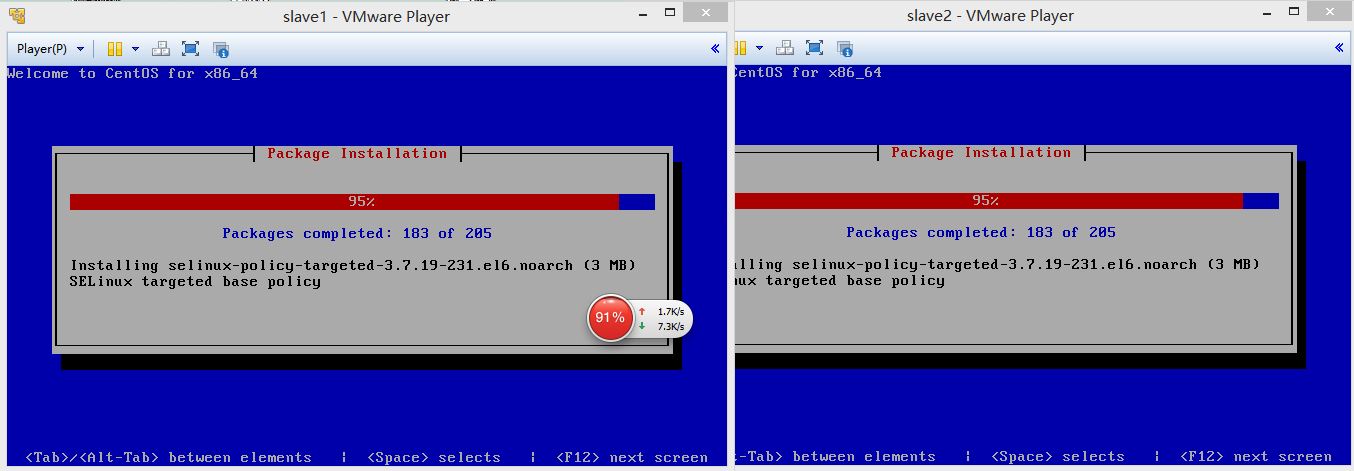
PXE安装进行中
宿主机4G的内存有些吃力。
安装完成
安装完成
遇到的问题
虚拟机没有设置bios网络启动就直接开始PXE安装了
大概是因为前面几项都引导不了,顺延到最后的网络启动了?我猜的。不过这样也好,省的装完还得进bios设置了,不用守着等装完了。(首次不用设置,重装依然需要进入bios设置网络引导)
关于局域网多个DHCP服务器的困惑
看到网上有些文章说虚拟机需要使用Bridge模式,我这里用NAT也没问题。我猜或许是因为下面的原因: DHCP获取IP地址是开机引导以后的事情,而虚拟机没有系统的时候都引导不了,VMnet8的那个DHCP服务器根本就不起作用。当待安装机器发现可以从我搭建的DHCP服务器网络引导之后,自然就用PXE Installer的DHCP服务器了。(不知道对不对)
sed引用变量
IMAGEDIR里面有个斜杠“/”,于是脚本一直报错:
sed:-e 表达式 #1,字符 :“s”的未知选项
换个分隔符(#)就好了
sed -i "s#^url.*#url\ --url=http://$IPADDR/$IMAGEDIR#g" $WEBDIR$KSDIR
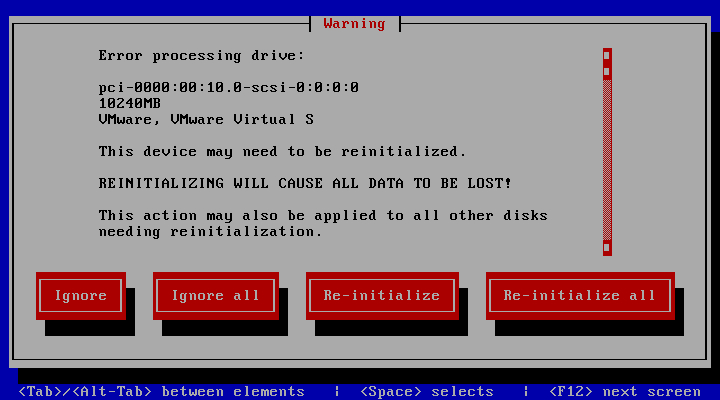
This device may need to be reinitialized
如图所示
小内存报错
搜索了一下,大部分答案都是说内存不足。centos6.0以上想进图形界面,内存必须大于512MB。虚拟机虽然分配的也是512,但大部分时候都会缩水的。[5]
解决方案,首先想到的是增加内存,可是宿主机内存有限,跑2台1G的虚拟机实在吃力。Google搜到的一些英文网页给出了可用的解决方案[6]:
Issue
The 'clearpart --initlabel' option in a kickstart no longer initializes drives in RHEL 6.3.
Environment
Red Hat Enterprise Linux 6.3
Anaconda (kickstart)
Resolution
Use the 'zerombr' option in the kickstart to initialize disks and create a new partition table.
Use the 'ignoredisk' option in the kickstart to limit which disks are initialized by the 'zerombr' option. The following example will limit initialization to the 'vda' disk only:
zerombr
ignoredisk --only-use=vda
使用zerombr选项。
参考资料
[1]. IBM文库. http://www.ibm.com/developerworks/cn/linux/l-tip-prompt/l-pex/
[2]. 51CTO博客. http://cwtea.blog.51cto.com/4500217/834991/
[3]. Fedora维基. ttps://fedoraproject.org/wiki/Anaconda/Kickstart/zh-cn
[4]. CSDN博客. http://blog.csdn.net/andy_yf/article/details/7749282
[5]. 51CTO论坛. http://bbs.51cto.com/viewthread.php?tid=910125&extra=&page=1
[6]. Linuxquestions. http://www.linuxquestions.org/questions/linux-distributions-5/problems-with-kickstart-initlabel-4175420572/#post4748080
附录
完整部署代码
#!/bin/bash
# Usage: PXE服务器自动配置脚本
# History:
# 20140428 annhe 完成基本功能
#Centos版本
VERSION=6.5
MIRROR=CentOS-$VERSION-x86_64-minimal.iso
WEBDIR=/var/www/html/
KSDIR=ks.cfg
IMAGEDIR=centos65/
#默认单网卡结构
IPADDR=`ifconfig eth0 |grep "inet\ addr" |awk '{print $2}' |cut -d ":" -f2`
#IMAGEURL=http://$IPADDR/$IMAGEDIR
# Check if user is root
if [ $(id -u) != "0" ]; then
printf "Error: You must be root to run this script!\n"
exit 1
fi
#检查网络
ping -c 2 baidu.com &>/dev/null && r=0 || r=1
[ $r -eq 1 ] && { echo "Network error! Please ensure you have connected the network....exit "; exit 1; }
#安装准备工作
function Initialize ()
{
#关闭selinux和iptables
sed -i "s/SELINUX=.*/SELINUX=disabled/g" /etc/sysconfig/selinux
service iptables stop
chkconfig iptables off
#准备启动镜像
rpm -qa |grep syslinux && r=0 || r=1
[ $r -eq 1 ] && yum install -y syslinux
#准备系统文件
[ ! -f $MIRROR ] && { echo "No Centos mirror found, Please Download it yourself and put it to the same directory with this script....exit"; exit 1;}
#挂载iso
[ ! -d /mnt/isoforpxe/ ] && mkdir /mnt/isoforpxe/
mount -o loop $MIRROR /mnt/isoforpxe/
#准备KS文件
cp conf/ks.cfg $WEBDIR$KSDIR
sed -i "s#^url.*#url\ --url=http://$IPADDR/$IMAGEDIR#g" $WEBDIR$KSDIR
}
#安装并配置TFTP服务器
function ConfigTFTPD ()
{
#安装tftp服务器
rpm -qa |grep tftp-server && r=0 || r=1
[ $r -eq 1 ] && yum install -y tftp-server*
rpm -qa |grep xinetd && rr=0 || rr=1
[ $r -eq 1 ] && yum install -y xinetd*
chkconfig --level 2345 xinetd on
cat > /etc/xinetd.d/tftp <<eof
# default: off
# description: The tftp server serves files using the trivial file transfer \
# protocol. The tftp protocol is often used to boot diskless \
# workstations, download configuration files to network-aware printers, \
# and to start the installation process for some operating systems.
service tftp
{
socket_type = dgram
protocol = udp
wait = yes
user = root
server = /usr/sbin/in.tftpd
server_args = -s /tftpboot
disable = no
per_source = 11
cps = 100 2
flags = IPv4
}
eof
# 上面要修改 disable 值为 no
#server_args指定tftpboot文件夹,建立该文件夹
[ ! -d /tftpboot ] && mkdir /tftpboot
#tftp服务器用于分发启动文件,包括 initrd.img pxelinux.0 pxelinux.cfg/default vmlinuz等文件
cp /usr/share/syslinux/pxelinux.0 /tftpboot #复制启动镜像到tftpboot目录
cp /mnt/isoforpxe/images/pxeboot/vmlinuz /tftpboot #复制Linux内核到tftpboot目录
cp /mnt/isoforpxe/images/pxeboot/initrd.img /tftpboot #复制ramdisk的映像文件到tftpboot目录
[ ! -d /tftpboot/pxelinux.cfg ] && mkdir /tftpboot/pxelinux.cfg
#cp /mnt/isoforpxe/isolinux/isolinux.cfg /tftpboot/pxelinux.cfg/default #复制启动配置文件
#编辑启动配置文件
cat > /tftpboot/pxelinux.cfg/default <<eof
default linux
#prompt 1
timeout 600
display boot.msg
menu background splash.jpg
menu title Welcome to CentOS 6.5!
menu color border 0 #ffffffff #00000000
menu color sel 7 #ffffffff #ff000000
menu color title 0 #ffffffff #00000000
menu color tabmsg 0 #ffffffff #00000000
menu color unsel 0 #ffffffff #00000000
menu color hotsel 0 #ff000000 #ffffffff
menu color hotkey 7 #ffffffff #ff000000
menu color scrollbar 0 #ffffffff #00000000
label linux
menu label ^Install or upgrade an existing system
menu default
kernel vmlinuz
append initrd=initrd.img text ks=http://$IPADDR/$KSDIR
eof
#ks=url指定了ks文件的访问路径
}
#安装并配置DHCP服务器
function ConfigDHCPD ()
{
rpm -qa |grep dhcp-[0-9] && r=0 || r=1
[ $r -eq 1 ] && yum install -y dhcp
chkconfig --level 2345 dhcpd on
#使用安装服务器的网关
GATEWAY=` ip route show |grep default |awk '{print $3}'`
NETWORK=`ip route show |grep src |awk -F '[/]' '{print $1}'`
NETMASK=`ifconfig eth0 |grep "inet\ addr" |awk -F '[:]' '{print $4}'`
BROADCAST=`ifconfig eth0 |grep Bcast |awk -F '[:]' '{print $3}' |awk '{print $1}'`
DNS=`cat /etc/resolv.conf |grep nameserver |awk 'NR==1 {print $2}'`
RANGE_FROM=`echo $NETWORK |awk -F '[.]' '{print $1"."$2"."$3"."[3]$4+2}'`
RANGE_TO=`echo $BROADCAST |awk -F '[.]' '{print $1"."$2"."$3"."[4]$4-3}'`
cat > /etc/dhcp/dhcpd.conf <<eof
#
# DHCP Server Configuration file.
# see /usr/share/doc/dhcp*/dhcpd.conf.sample
# see 'man 5 dhcpd.conf'
#
#
ddns-update-style interim;
ignore client-updates;
allow booting;
allow bootp;
subnet $NETWORK netmask $NETMASK {
option routers $GATEWAY;
option subnet-mask $NETMASK;
option domain-name-servers $DNS;
option time-offset -18000; # Eastern Standard Time
range dynamic-bootp $RANGE_FROM $RANGE_TO;
default-lease-time 21600;
max-lease-time 43200;
next-server $IPADDR;
filename "pxelinux.0";
}
eof
#上面配置中指定了启动镜像的名字(pxelinux.0)及TFTP服务器地址,以便从TFTP服务器获取必要文件
}
#配置HTTP服务器
function ConfigHTTPD ()
{
#安装http服务器
rpm -qa |grep httpd-[0-9] && r=0 || r=1
[ $r -eq 1 ] && yum install -y httpd
sed -i "s/#ServerName.*/ServerName localhost:80/g" /etc/httpd/conf/httpd.conf
chkconfig --level 2345 httpd on
#复制安装镜像到web目录
[ ! -d $WEBDIR$IMAGEDIR ] && mkdir $WEBDIR$IMAGEDIR
cp -rf /mnt/isoforpxe/* $WEBDIR$IMAGEDIR
}
function StartAll ()
{
echo -e "\n======================================================================="
/etc/init.d/xinetd restart
/etc/init.d/dhcpd restart
/etc/init.d/httpd restart
echo -e "\n======================================================================="
}
Initialize 2>&1 | tee -a init_pxeserver.log
ConfigTFTPD 2>&1 | tee -a init_pxeserver.log
ConfigDHCPD 2>&1 | tee -a init_pxeserver.log
ConfigHTTPD 2>&1 | tee -a init_pxeserver.log
StartAll 2>&1 | tee -a init_pxeserver.log
Pingback: 基于Kickstart的Hadoop集群自动化部署 | 知行近思
扩展阅读:http://www.syslinux.org/wiki/index.php/PXELINUX
终于写完了 以后不能乱搞数据库了,wp-post表崩溃,修复完写了2天的文章差点没了,幸亏浏览器缓存了
数据库自动备份插件→_→写这么多不容易。。。现在我都没时间好好写一下博文 〒_〒
自动备份倒不需要,我数据盘单独的,应该还是比较安全的,昨天是意外,把张表搞崩溃了